How to get a high score
After a successful landing, you can open the landing analysis screen, which will show a lot of information about your performance.
Let's start with what's needed for a perfect landing:
Main gear touchdown
- Airspeed between 195 and 205 KEAS
- Vertical speed less or equal to 6 feet per second
- On centerline, max. distance 10 feet
- Within the nominal touchdown zone 2500 to 2700 feet from the runway threshold (see below)
Nose gear touchdown
- Airspeed less or equal to 180 KEAS
- Slapdown pitch rate less or equal to 8 degrees per second
Gear struts weight limits
- Main gear: max. 220,000 lbs each
- Nose gear: max. 75,000 lbs
Assuming that no other limit has been exceeded, not meeting one of the above criteria will result in a good landing grade, not meeting two or more will show a safe landing.
If you only slightly exceed limits like the vertical speed at touchdown, or the slapdown pitch-rate, your landing will be filed as hard landing in the statistics (the Orbiter might be damaged, but the crew is safe). Anything else (exceeding the ground-speed limit, blowing a tire, missing the runway, exceeding the airspeed or g-force limits during flight, etc.) will result in either a crash or a crash landing.
You may touch down anywhere on the runway for a safe or even good landing, but for a perfect landing you'll need to touch down withing the nominal touchdown zone:
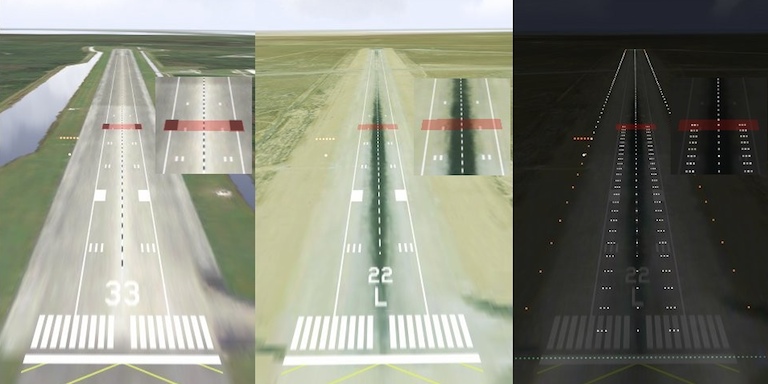
The image shows the location of the touchdown zone (marked by a red rectangle) relative to the runway markings at KSC (left), Edwards (center) and relative to the runway lights on a night approach (right).
Note that at the shuttle landing facility at the KSC the touchdown zone is marked by two large black rectanges. On a night approach, the last set of lights is at the center of the touchdown zone.
Turning on the approach corridor in the settings menu will also highlight the touchdown zone.
How the numerical score is computed
All variables (touchdown position, vertical speed, approach precision, etc.) are taken into account. As long as you don't crash, you should get a score.
There's a bonus for safe, good and perfect landings, so typical scores are:
- less than 50,000 for crash landings
- less than 150,000 for hard landings
- about 250,000 for safe landings
- about 500,000 for good landings
- about 800,000 for perfect landings
Achieving a perfect landing is very hard and you'll need a lot a practice and patience. Be sure to read the Landing Tutorial and watch the autoland-demo a few times (both are accessible from the help-screen), the auto-pilot usually performs quite well.
Here are some more tips:
- Try to stay aligned with the runway centerline during final approach (watch the guidance diamond or perform a visual approach) and try to touchdown exactly on the centerline.
- Keep the nose up (the boresight—the plus sign in the HUD—about 7 to 10 degrees above the horizon) after main gear touchdown.
- Carefully start to derotate at about 175 KEAS.
- The nose gear should touch down at about 150 KEAS—the drag chute will first open 40% about 1 second after it's been deployed. It will remain reefed at 40% and will start to open fully 5.5 seconds after it's been deployed. Since the drag chute is mounted right below the rudder (and above the vehicles center of gravity) it causes a positive pitching moment. Try to time the nose-gear touchdown with the fully opening chute, this will cushion the slapdown.
- Use differential braking to stay on the centerline and decelerate the vehice, but be gentle.
The score is computed at nose-gear touchdown and won't change later, so you don't have to wait until wheels stop to see your landing score.
Happy landings!