Landing tutorial
F-SIM Space Shuttle is a very realistic simulation, and safely landing the orbiter is not an easy task. NASA's astronauts spend hours of training in a simulator and must perform 1,000 real landings with the shuttle training aircraft (STA) before they can fly the real thing.
But don't worry, with a little practice you can do it too, and the instructions below should get you started. Begin with practicing the final approach, and when you've got a feeling for controlling the orbiter you can try the full approach. Once you've mastered that, you can configure cross-winds, gusts and turbulence to make the approach and landing more challenging.
For your first approaches, you can turn on the visible approach path feature in the view settings menu (it’s on per default). This will show a corridor of rectangles to fly through. Try to stay inside the corridor.
The following paragraphs explain how to perform a precision approach with the aid of the instruments shown in the head up display (HUD). Once you’ve performed a couple of successful landings, turn off the visible approach path and focus on the HUD.
Head up display
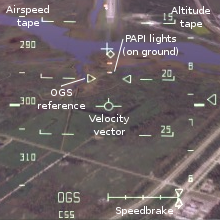
In the head up display (HUD) you will see your airspeed (the tape on the left side) and altitude (the tape on the right side). The lines parallel to the horizon are the pitch attitude scales, the numerical value of the scale is displayed at the right end of each line. The symbol in the center of the HUD is the velocity vector, it tells you in which direction the orbiter is currently moving. Its position in the HUD can move, and under high G-forces or strong crosswinds it might drift several degrees off the HUD center.
For a throughout discussion of all HUD symbols and display modes, please refer to the Head Up Display Systems Brief.
Final approach
|
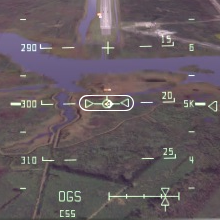
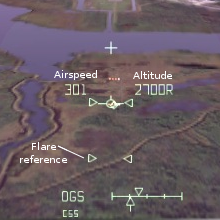
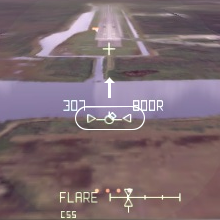
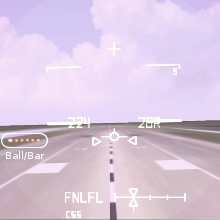
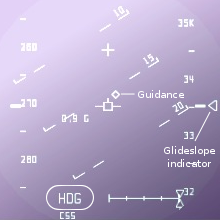
This will put you right in front of the runway, at an altitude of about 11,000 feet above ground level, on the so called outer glide slope (OGS). Align the velocity vector with the OGS reference (the two triangles on the 20° pitch line.) The set of precision approach path indicator (PAPI) lights farther away from the runway should be in the center of the velocity vector, and you should see two white and two red lights. Try to stay on the glide slope by keeping the velocity vector, the OGS reference and the PAPI lights aligned. At about 4,000 feet you'll see a second set of triangles (the flare reference) slowly moving upwards. At about 3,000 feet the HUD will automatically declutter and the airspeed and altitude tapes as well as the pitch attitude scales will disappear. The airspeed is now displayed digitally on the left side of the velocity vector, and the altitude on the right. Continue on the outer glide slope until the flare reference triangles merge with the OGS reference (at about 1,800 feet.) Now slowly pull up and keep the velocity vector aligned with the flare reference. This is called the pre-flare maneuver, which will align the orbiter with the 1.5° inner glide slope. During all that, don't forget to keep the orbiter aligned with the runway centerline! Speedbrakes are controlled by the autopilot, and the gear is automatically deployed at 300 ft (in the real orbiter, the gear has to be armed and deployed manually.) As you approach the runway, you'll see a set of red lights, and a larger white light on the left side of the runway. This is the ball-bar light system. If the white light (the ball) is (from your point of view) exactly in front of the red lights (the bar), you're on the inner glide slope. If the ball is above the bar, you're too low, if the ball is below the bar, you're too high. At about 50 feet start to pull up for the final flare. Your speed should match your altitude: 240 kts at 40 feet, 230 kts at 30 feet, etc. You should touch down with an airspeed between 195 and 205 kts, and a vertical speed less than 6 feet per second. After touchdown, keep the nose up until the airspeed drops below 185 kts. Then slowly derotate, try to put the nosewheel down as gently as possible. Stay on the runway centerline - stick input will move the rudder, and apply differential braking. At lower roll speeds, it will also mix in nose wheel steering. Braking (using the wheel brakes) is controlled by the auto-pilot. GuidanceDid you notice the little diamond symbol that moves with the velocity vector in the HUD? This is the guidance, and it shows what the autopilot would do. If it moves to the right, the autopilot would issue a right bank command, if it moves upwards, the autopilot would pull up, etc. Try to keep the guidance inside or close to the velocity vector - this way you'll fly exactly as the autopilot would. |
|
Full approach
|
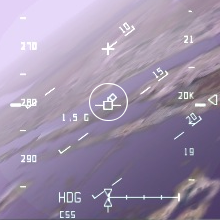
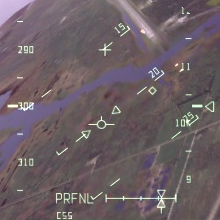
Depending on HAC (Heading Alignment Cone) turn angle, you'll start between 20,000 and 50,000 feet. Stay on your heading for about 20 seconds before turning into the HAC. Listen to the (co-)pilot to be sure in which direction to turn! As soon as the guidance mode (the text line in the lower left corner of the HUD) switches from ACQ to HDG, start rolling to a bank angle of about 45°. Watch the guidance diamond. You don't have to keep it centered all the time, but if it's well "ahead" of the flight-director (FD) symbol, increase the bank angle to catch up. Similarly, if the FD symbol is ahead, decrease the bank angle. You'll also have to stay on the glideslope. At high altitudes, the glideslope is about 15° steep, so keep the FD symbol close to the 15° pitch scale. The glide slope will gradually increase to about 20° in the approach and landing phase. The guidance diamond will also move up- and down. Pull up a bit if it's above the FD symbol, and push down if it's below. You can also monitor the glideslope indicator (the triangle on the right side of the HUD.) It is a fly-to indicator, so if it's above the mark, you're below the glideslope, and vice versa. Mission control will radio as you pass each checkpoint on the HAC ("you'on at the 180, 90, etc.") If you've managed to stay on the HAC, you'll eventually be aligned with the runway. The FD symbol will change into a velocity vector, and you can proceed with the final approach. |

|